Muddy Sheep
  • Home
  • Blog
  • Patterns
  • Tutorials
  • About
  • Northern Flurries Shawl

Increases: Make 1 left, right, knit-side, purl-side, with hole, no hole...

17/7/2014

41 Comments

 
Picture

Increases Part 1 - Make 1

A friend in my knitting group asked me to write a post about the different increases in knitting. It's going to have to be several posts - why am I still surprised about how long these things take to pull together? 

I'm starting with the work-horse of the increases: make 1, abbreviated to 'M1' usually in patterns. It can lean to the left or the right, and it can be made on the knit or the purl side. And if you don't twist the new stitch as you form it you make a hole. Pictures of each of these are shown below.

Picture
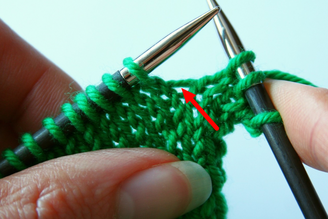
An M1 increase is formed between two stitches, using the length of yarn, or 'bar', that runs between the two stitches where you want a new stitch. The bar is shown in the picture on the right.

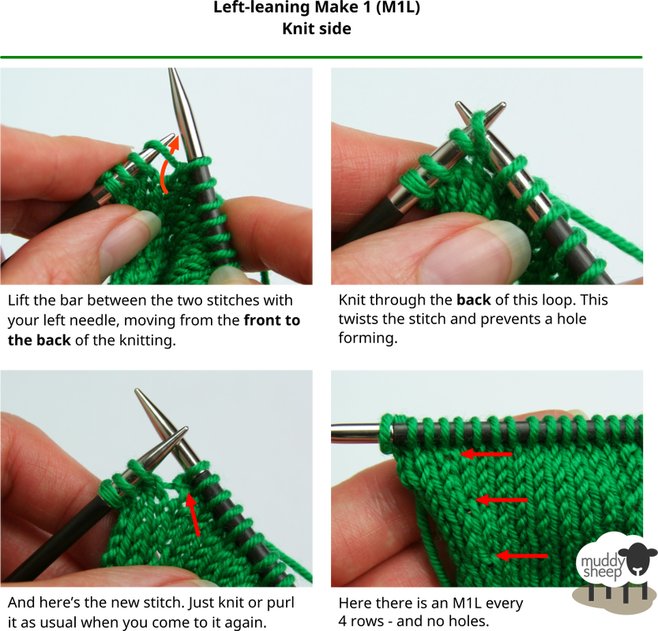
Patterns often don't specify which increase to use, just saying M1 rather than M1L (for left-leaning) or M1R (for right-leaning). Then you can do whichever you like. I find the left-leaning version easiest to do and I've shown it first.


Picture

Picture

It's less common to increase on the purl side, but it's useful to know how: 
Picture

Picture

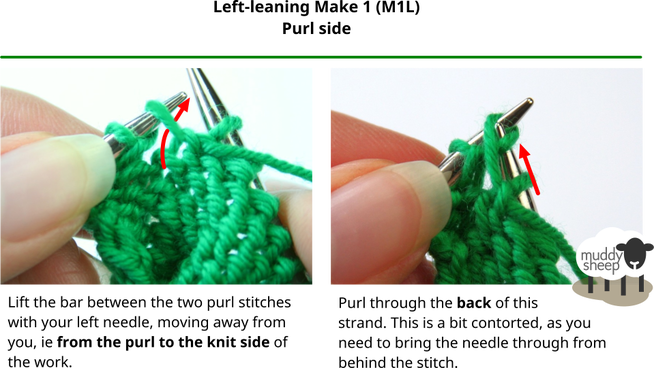
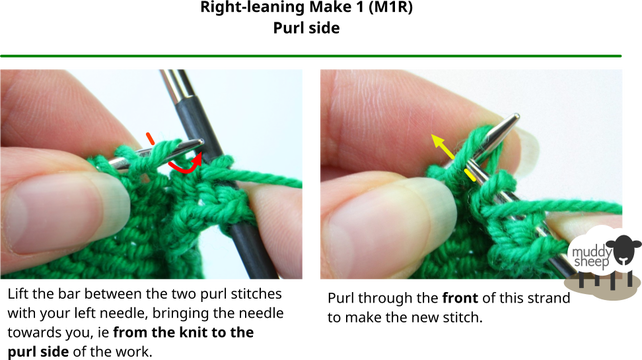
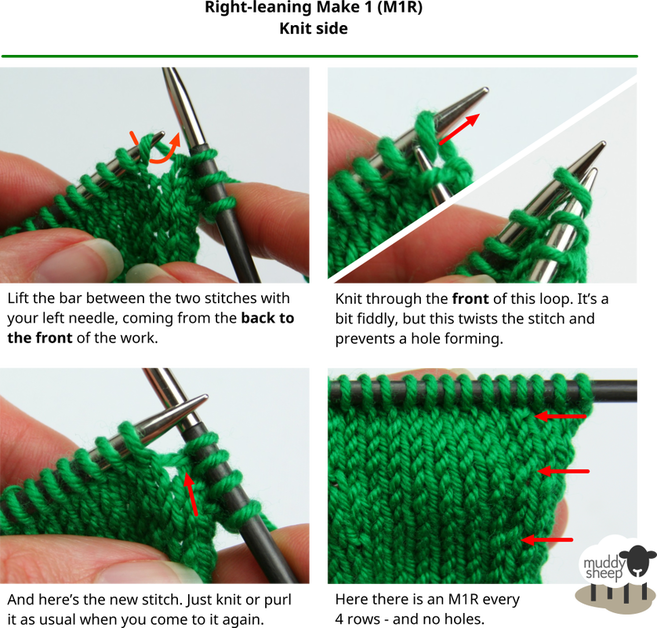
So for a left-leaning Make 1, whether on a knit or a purl row, move the left hand needle away from you to pick up the bar. For a right-leaning Make 1, move the left hand needle towards you to pick up the bar. I remember this because if someone has left they're going away from me.

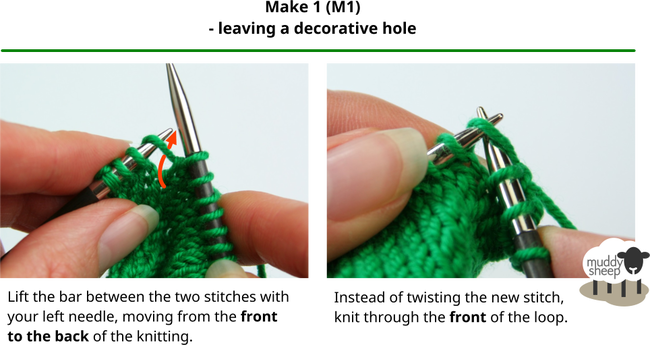
Finally, if you want to leave a decorative hole, then you can - just don't twist the stitch:
Picture

I want these tutorials to be as useful as possible, so let me know if there's anything that's not clear or where I could make improvements.


Next post will be all about Yarnsub - wahey!
41 Comments
Sandi Carr
27/1/2015 08:38:04 pm

On my pattern, for the increase rounds, it says "k2, p2, pm, k1,m1v etc.
What does pm mean?

Reply
Wendy link
28/1/2015 05:16:34 am

Hi Sandi... usually pm means 'place marker', as in put a marker - like a small ring of plastic - on your needle at that point so as to make sure you don't miss where you need to increase or decrease - does that make sense for your pattern?

Reply
Maggie link
26/3/2015 08:26:53 am

This is so helpful, thank you! I've been reading and watching videos, but your pictures and descriptions are by far the easiest to understand. 😊

Reply
Wendy link
27/3/2015 05:02:27 am

Thank you Maggie - that's lovely to hear!

Reply
stephanie
14/10/2015 02:12:29 pm

I have a pattern where I am suppose to do a M1L after a purl stitch and before a knit stitch on the right side (M1L on RS). Which method do I use. M1L on the purl side or M1L on the right side? I tried the M1L on the right side but when I look at my work, the new stitch is not tight, it is much looser than the other stitches. I don't think it looks like it shold. Please let me know what I am suppose to do. Thank you in advance for your answer. Love your explanations, very clear.

Reply
Wendy
14/10/2015 04:36:22 pm

Hi Stephanie... I'd really need to see the pattern to know for sure or at least a picture - do you have a link to it on Ravelry so I could take a look?

Reply
stephanie
14/10/2015 09:07:13 pm

Thank you for the quick response.
I have a pdf file for the pattern but I had to buy it on ravelry. So I don't know if I am allowed to send you that pdf since the pattern belongs to someone that sells her work. But I can assure you that the pattern calls for a M1L. Here is what the pattern calls for:
2_round: *k to M, sM, p to M, sM*, repeat from * to*
3_increased round: *m1l, k to M, m1r, sM, k to M, sM,* repeat from * to *.
4_round: repeat round 2

Repeat round 3 + 4 for 10 more times until you have the 42 stitches

So as you can read, when I go from round 4 (which is a repeat of round 2) which ends with a p to M, sM to a round 3 that calls for the m1l, I finish with a purl stitch on the right side of work followed by a sM and starts my round 4 with a m1L followed by a knit stitch. So what am I suppose to do?

Thank you for helping me out!

Wendy
15/10/2015 12:22:07 am

You'd need to check what you're doing straight after this section to be sure, but I think you could avoid the loose increase by moving it to the end of the increase round (well, really the start of the next round because you'd have to slip the marker first) instead of doing it at the beginning. That way you do the increase between two knit stitches rather than between a purl and a knit.

Does that make sense?

Reply
stephanie
15/10/2015 01:24:05 pm

Thank you for the answer. Not sure if what you are suggesting works. I don't have a lot of experience knitting. I will go to my knitting shop to get their help because I need to figure this out before I can continue with this pattern. Thanks a million for your help! I will let you know the outcome. Have a great day.

stephanie
15/10/2015 09:27:12 pm

I went to the knitting shop and they said I was doing it right. The looser stitch happens because I am making a M1L after a purl and before a knit. They suggested I twist my strand to make the stitch tighter. Hope this works! Thanks again for all your help. Love your site!

Reply
Wendy
16/10/2015 11:39:29 am

Yes, you were definitely doing it right! I did try out moving the increase so that it's worked between two knit stitches (by doing it at the end of the round) and it does work. But if you're not confident about doing that I agree that you're best to stick to following the pattern - nobody else will notice the loose stitch!
Take care,
Wendy

Reply
Shelby
16/5/2016 11:51:58 pm

I love your advice and that you share your expertise. I attempted to subscribe for the e-mail and was "told" that it wasn't possible! Hrrmmph. Is this true? I'm a much better knitter than I am a computer whiz! Tee hee. Thanks, I appreciate your reply.

Shelby

Reply
Wendy link
17/5/2016 07:38:15 pm

Hi Shelby,
I've been spectacularly lax at posting as you might have seen! This will be changing in the next few weeks though, so I'll double check that the sign-up process works properly and let you know when it's sorted!
Best,
Wendy

Reply
Natalia
9/8/2016 11:02:15 pm

I like to do increases differently. I usually make yo and do twisted knit in the next row. much easier.

Reply
Wendy link
10/8/2016 08:13:34 pm

Hi Natalia, it's great that you've found an increase that you're comfortable with. There are many different increases, with pros and cons for each of them.

The cons of the yarn over increase are that you have to think about it on two separate rows; it uses more yarn than a make 1 increase, so a loose knitter might find it makes a hole even when twisted; and it always produces a left-leaning increase unless you take the yarn over the needle in the other direction.

But that's one of the things I love about knitting - there's always another way to do things and you get to choose the one that you like best!

Reply
Orsi link
23/8/2016 03:28:01 am

Thanks, this is very useful and such a good explanation!

Reply
Wendy link
27/8/2016 06:48:54 pm

Thanks Orsi!

Reply
Nancy
28/11/2016 09:23:12 pm

Thank you for your tutorial; however, it would have been very nice if you were to add a "print" function somewhere that would only print out the instruction. Thank you again for your help.

Reply
Ann
5/12/2016 10:43:06 pm

Thank you thank you for the photos and explanation/descriptions! I have started over 4 times because my m1lp were not consistent. I plan to print this and have it to refer to so I am consistent. Fingers crossed it is the answer to my troubles. ☺️

Reply
Jen
8/2/2017 10:33:41 pm

Thank you so much for these helpful photos: so clear and easy to understand. Looked at other tutorials before I found yours and didn't quite get the "towards you/away from you" thing until I found yours! Much appreciated!

Reply
Wendy link
9/2/2017 03:24:29 pm

Glad to help!

Reply
Gina
16/2/2017 10:04:51 pm

Thank you so much, that is definitely the best explanation I have ever found! Happy knitting, Gina

Reply
Annette
28/4/2017 03:28:45 am

This is such a nifty tutorial. I really prefer pics and text to a video. Yours are the clearest I've seen. Thank you.

Reply
Angie
30/4/2017 11:21:24 pm

Yarn over PURL – two how is the second row work

Reply
Elizabeth
15/8/2017 02:47:41 pm

Are the purl decreases leaning the way they are on the right side or wrong side of the fabric? Different sources say different things

Reply
Wendy
24/10/2017 07:43:26 pm

Hi Elizabeth, sorry I missed your message before... I have given the direction that the increases made on the wrong/purl side will lean on the right side.

Reply
Penny Campbell
23/10/2017 07:57:42 am

At last! Clear, concise and straightforward instructions- many thanks for sorting out the mysteries of M1.

Reply
Wendy
24/10/2017 07:44:10 pm

So glad to be of help :)

Reply
Michelle
31/1/2018 10:10:43 pm

Thanks that was fantastic information, helped me out a lot. My pattern went from M1 knit, to P1 next row and I was always getting holes.

Reply
Anna
21/3/2018 06:10:11 pm

I have a pattern from the 40s that calls on the right side for inc. 1 knitwise, slip 1 k 1 psso, and then farther along in the same row K2together, inc. 1 knitwise. No problem with that --- the arched design makes it clear that the first increase should be right-leaning and the second left-leaning. But several rows later the first increase is given as inc 1 purlwise, s 1 k 1 psso, then the second increase is again k2 together, inc. i knitwise.
At the same time I am increasing purlwise on the wrong side.
Should I assume that the purlwise increase on the right side is a misprint?

Reply
Wendy
22/3/2018 10:53:12 am

Hi Anna,

It's difficult to be sure without seeing the picture, but my best guess is that you're right, it's a misprint. Unless you can see that there's an obvious purl-bump in the picture at that point in the pattern, then I'd personally go with the 'knitwise' option.

Hope it works out!

Reply
Anna S
4/4/2018 05:29:01 am

Thank you; I tried it both ways and it is a misprint.
One other thing: when you describe right- and left-leaning increases on the purl side, you do mean that they're right- and left-leaning as seen from the knit side, don't you?
I really appreciate the clear instructions! And the mnemonic device at the end.

Reply
Kerstin
27/11/2018 01:46:24 pm

I am currently working with a pattern that does two different m1 increases with a decorative hole leaning to the left and right, so there is one more way. The one kind leaves a smaller hole than the other, though, and I am looking for way to fix this without losing its orientation. Would you know of a way to do this?

Reply
Wendy link
28/11/2018 03:19:28 pm

Hi Kerstin,

I can't visualise the decorative holes leaning in different directions - would you be able to send me a picture of your work? (wendy at muddysheep dot com)

More yarn is needed to go round the needle in one direction than the other, depending on whether it's a knit or purl before and after the Yarn Over. If you know which version is smaller, it should work to make a conscious effort to put more yarn into the Yarn Over. Alternatively if you want to make the large one smaller, just heave a bit of yarn out of the Yarn Over before you make the next stitch.

If you don't mind sending me the picture that would be great - I'm interested to see it.
Wendy

Reply
Leather Oregon link
23/3/2021 05:06:56 pm

Great post, thanks for sharing it

Reply
Donna
22/6/2022 03:49:25 am

This was very helpful, thank you! I prefer photos like this, I hate sitting through video waiting for the relevant parts I want to see and then having to stop and go back to get a still shot. This is exactly what I was looking for!

Reply
Carol
4/7/2022 01:29:56 am

My pattern calls for M1R( purl) on the knit side. So I guess it is M1R purlwise but how to do this on the right side??

Reply
Wendy
4/7/2022 06:38:32 am

Hi Carol,
It's unusual to make a purl increase on the knit side, so it could be a typo. Does it look like there should be a purl bump in the knit side at that point? If so, I don't think you can really tell the "direction" of a M1P, so you could do either. Without seeing the pattern, I don't know for sure though.
Wendy

Reply
Ruth
12/9/2022 09:25:44 am

I'm here today because I was following the instructions on a pattern and they produced unintended holes. I hunted through my things and found a printout of this from many many years ago. I knew it was exactly what I needed but it had got wet at some point and was unreadable. I am so glad your website is still here! I have printed it out again and I hope it will last me many more years.

Reply
Wendy Peterson
12/9/2022 03:51:41 pm

That is so lovely to hear! Thank you :)

Reply
Di
30/12/2022 12:11:18 am

Thank you so much for these clear instructions with images, so easy to follow. Much appreciated 😊

Reply


Leave a Reply.

    Picture
    Yarnsub
    Find your perfect substitution

    Subscribe...

    Enter your email address:

    Delivered by FeedBurner

    follow us in feedly
    Follow on Bloglovin
    Muddy Sheep on Pinterest

    Blogs I read
    Attic 24
    Knitsofacto
    LIttle Cotton Rabbits
    Mason-Dixon Knitting
    Planet Penny
    Poppy in Stitches
    Purl About Town
    Woolwinding

    Archives

    December 2016
    December 2014
    October 2014
    September 2014
    August 2014
    July 2014
    June 2014
    May 2014
    April 2014
    March 2014
    February 2014
    January 2014
    December 2013


    Categories

    All
    Cake
    Children Knitting
    Contoured Intarsia
    Garter Stitch
    Gift Knitting
    Intarsia
    Knitting Group
    Knitting In Public
    Technique
    The Cat
    The Fish Blanket
    Yarnsub

Powered by Create your own unique website with customizable templates.